INSTALLING ENTHOUGHT FOR WINDOWS (XP, VISTA, 7, OR 8)
To download Enthought Canopy on your Windows machine, you should follow these steps:
● Visit the Enthought website's download page (https://www.enthought.com/downloads/)
● The site should detect your operating system, but check that it shows "Windows". If you are running 32-bit Windows, be sure that you have selected the 32-bit flavor. (If you are running 64-bit Windows, you can download either flavor.) Click the green "Download Canopy…" button.
NOTE: the course has been tested on the 32 bit Python version. You can run 64 bit if you want, but we can’t promise that every assignment will run correctly.
● In most cases (except as noted in the next bullet point), you will not need administrative privileges to install Canopy. Once the file has downloaded to your system, start the installer by double-clicking the downloaded file. Verify that the publisher is listed as Enthought, Inc. and click "Run." Follow the installer instructions and complete the installation.
● Note: If your Windows login user name includes any international (non-ASCII, i.e. non-English) alphabet letters, you will need to install a little differently. Either install Canopy "for all users" as an administrator or log in as a different user who has an ASCII user name. You can read detailed instructions in this article in the Enthought Support Knowledge Base.
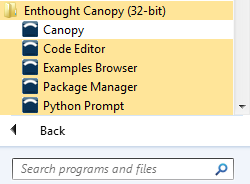
Once the installation process is complete, the last step is to set up your Python environment. Launch Canopy by selecting it from the Windows Start Menu in the Enthought Canopy folder.
The application will guide you through the setup process:

If you have an ASCII (English letters, numbers, and punctuation) user name, then you should accept the directory which is proposed. Otherwise, we suggest entering
C:\Program Files\Canopy
See this article in the Enthought Support Knowledge Base for more details.
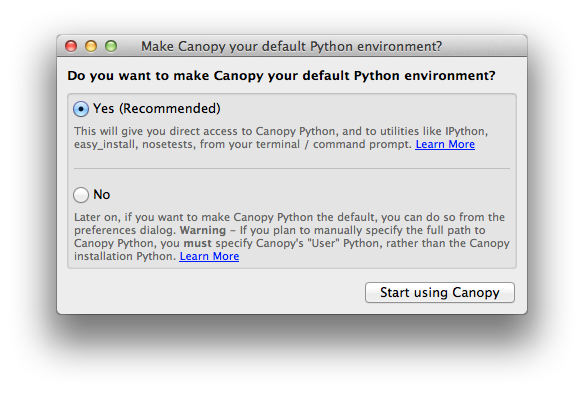
After the environment is installed, Canopy prompts you to make it the default Python environment:
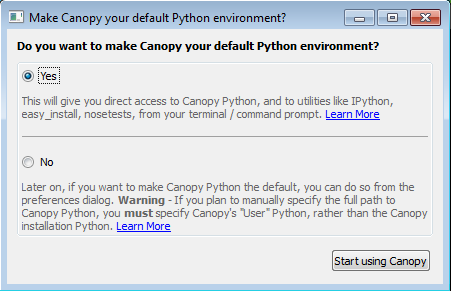
For most users (and for all new Python users), the default “Yes” response will be the most convenient. However, if you are also using another Python distribution, it will be safer to select “No” for now, so as not to interfere with the operation of your other Python. You can still run Canopy Python safely inside the Canopy application's editor.
Once you have made your selection and set up your environment, the Canopy Welcome screen should be visible. If there are any Canopy application updates available, you will see a note in the bottom-right corner of the Welcome window, which you can click to open the About window in order to install the updates. You can also view this window by clicking “Canopy Application Updates…” from the Help menu. Please install any available updates.
Canopy is now set up and is ready to use!
Expert note (optional): if you choose not to make Canopy your default Python environment, but you still do want to use Canopy User Python from the Windows command line, please read this article first to avoid confusion, since Canopy User Python does not live where you might assume it does.
CANOPY APPLICATION OVERVIEW
To help you get an understanding of the Canopy application, this article in the online Canopy User Guidedescribes the basics of the Editor. You can also access the User Guide offline through the Canopy application by selecting the "Documentation Browser" from the Welcome screen (the User Guide is the top item listed in the Documentation Browser window).
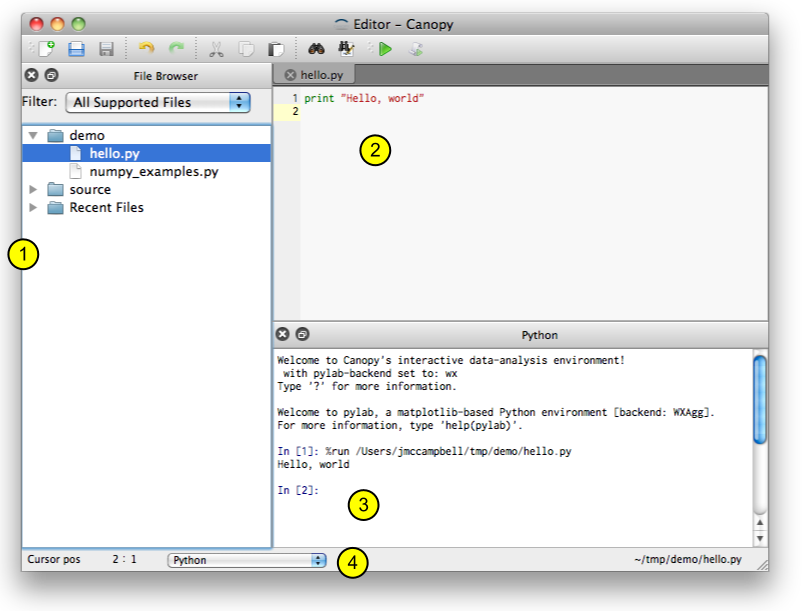
Opening an Editor window typically presents you with the following (screenshot is from Mac OS X, but are similar in Windows):

This window combines three commonly used parts: (1) File Browser, (2) Code Editor, and (3) Python (IPython) interpreter pane.
- The IPython prompt looks something like this:
In [1]:
- Try typing the following simple expression after the IPython prompt:
3*5
- What happens when you press the Enter key?
- Try typing the following simple expression after the IPython prompt:
'foobar'
- What happens when you press the Enter key?
To create, save, run, and re-open a file:
- In the Canopy Editor's File menu, select "New", then "Python file". On the first line of the new file, type the following:
print 'hello world'
- You will want to save your files in a location specific for this course. To do that, first create a directory (or folder) for your 6.00.1x material, with an appropriate name.
- To create a new folder using Canopy:
- Use the File Browser to browse to the existing folder where you want to create your course folder. (If you can't find the desired existing folder in the File Browser, you can right-click and select "Add Top-Level Path".)
- Right click on that existing folder and click "Create Directory", which will create a new folder inside the existing folder.
- Type a name for the new folder, such as “6.00.1x Files,” and press ENTER.
- Or, to create a new folder using Windows, go to the location (either another folder or the desktop) where you want to create the folder. Right-click a blank area on the desktop or in the folder window, point to New, and then click Folder. Type a name for the new folder, such as “6.00.1x Files,” and press ENTER.
- Now you will save your "hello world" file in the new folder that you just created.
- From the Canopy File menu, click Save As and then navigate to your course folder before typing a name for this file, e.g., "pset0Test.py".
- Note: Be sure to type the ".py" file extension, so that Canopy and Windows recognize this as a Python file! In other words, always save your Python files as fileName.py, instead of just fileName
- Click the Save button.
- At this point, please add your course folder (“6.00.1x Files” in our example) to the Canopy File Browser so that you have easy access to it each time you start Canopy. To do this, expand the Recent Files folder in the side pane and right-click on the file you just saved. Select Add directory as Top-level and now you should see your course folder in the File Browser.
- From the Canopy Run menu, click on "Run File".
- What happens?
- Go back to the Code Editor and add the following line:
print 'I like 6.00.1x!'
- Select “Run File” again (you can also use the green triangular Run button on the toolbar).
What happens?
- Close your test file by clicking the X in its filename tab.
- Now reopen your test file by double-clicking its name in the File Browser's "Recent Files" folder.
Congratulations - your Python environment has been installed, and you now know how to enter expressions in Python and how to save, run, and open files!
INSTALLING ENTHOUGHT FOR MAC OS X (10.6.2 AND ABOVE)
To download Enthought Canopy on your Mac (Apple) machine, you should follow these steps:
- Visit the Enthought website's download page (https://www.enthought.com/downloads/)
- The site should detect your operating system, but check that it shows "Mac OS X". We suggest downloading the 32-bit flavor for maximum graphics compatibility. Click the green "Download Canopy…" button.
NOTE: the course has been tested on the 32 bit Python version. You can run 64 bit if you want, but we can’t promise that every assignment will run correctly.
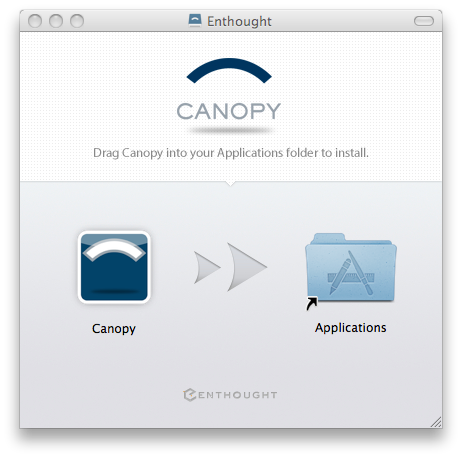
- Once the file has downloaded to your system, start by double-clicking the .dmg file to mount the image. Opening this file displays the installation window shown below. Canopy can be installed by dragging the Canopy icon to the Applications folder in the window, to the computer Desktop, or to another folder. If you drag it to the Applications folder, it will show as “Canopy” along with your other applications.
Once Canopy is copied to your system, the last step is to set up your Python environment. Double-clicking the Canopy icon in your Applications folder will start Canopy, and the application will guide you through the setup process.
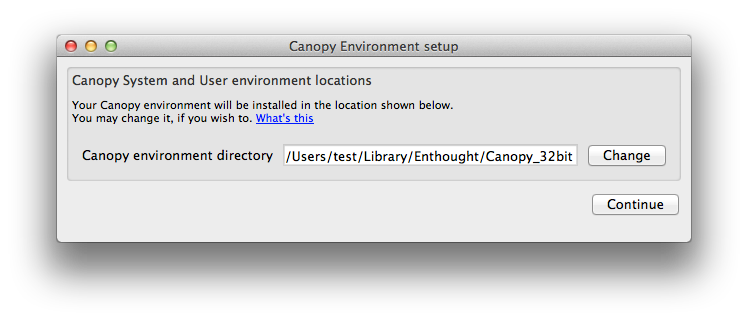
If you have an ASCII (English letters, numbers, and punctuation) user name, then you should accept the directory which is proposed. Otherwise, we suggest entering
/Applications/Canopy
See this article in the Enthought Support Knowledge Base for more details.
After the environment is installed, Canopy prompts you to make it the default Python environment:
For most users (and for all new Python users), the default “Yes” response will be the most convenient. However, if you are also using another Python distribution, it will be safer to select “No” for now, so as not to interfere with the operation of your other Python. You can still run Canopy Python safely inside the Canopy application's editor.
Once you have made your selection and set up your environment, the Canopy Welcome screen should be visible. If there are any Canopy application updates available, you will see a note in the bottom-right corner of the Welcome window, which you can click to open the About window in order to install the updates. You can also view this window by clicking “Canopy Application Updates…” from the Help menu. Please install any available updates.
Canopy is now set up and is ready to use!
Expert note (optional): if you choose not to make Canopy your default Python environment, but you still do want to use Canopy User Python from the terminal command line, please read this article first to avoid confusion, since Canopy User Python does not live where you might assume it does.
CANOPY APPLICATION OVERVIEW
To help you get an understanding of the Canopy application, this article in the online Canopy User Guidedescribes the basics of the Editor. You can also access the User Guide offline through the Canopy application by selecting the "Documentation Browser" from the Welcome screen (the User Guide is the top item listed in the Documentation Browser window).
Opening an Editor window typically presents you with the following:

This window combines three commonly used parts: (1) File Browser, (2) Code Editor, and (3) Python (IPython) interpreter pane.
- The IPython prompt looks something like this:
In [1]:
- Try typing the following simple expression after the IPython prompt:
3*5
- What happens when you press the Enter key?
- Try typing the following simple expression after the IPython prompt:
'foobar'
- What happens when you press the Enter key?
To create, save, run, and re-open a file:
- In the Canopy Editor's File menu, select "New", then "Python file". On the first line of the new file, type the following:
print 'hello world'
- You will want to save your files in a location specific for this course. To do that, first create a directory (or folder) for your 6.00.1x material, with an appropriate name.
- To create a new folder using Canopy:
- Use the File Browser to browse to the existing folder where you want to create your course folder. (If you can't find the desired existing folder in the File Browser, you can right-click and select "Add Top-Level Path".)
- Right click on that existing folder and click "Create Directory", which will create a new folder inside the existing folder.
- Type a name for the new folder, such as “6.00.1x Files,” and press ENTER.
- Or, to create a new folder using Mac OS, go to the Finder application. Open your Documents folder. Under the Wheel icon, click on New Folder. Name the folder something appropriate (eg "6.00.1x Files").
- Now you will save your "hello world" file in the new folder that you just created.
- From the Canopy File menu, click Save As and then navigate to your course folder before typing a name for this file, e.g., "pset0Test.py".
- Note: Be sure to type the ".py" file extension, so that Canopy and Mac OS X recognize this as a Python file! In other words, always save your Python files as fileName.py, instead of just fileName
- Click the Save button.
- At this point, please add your course folder (“6.00.1x Files” in our example) to the Canopy File Browser so that you have easy access to it each time you start Canopy. To do this, expand the Recent Files folder in the side pane and right-click on the file you just saved. Select Add directory as Top-level and now you should see your course folder in the File Browser.
- From the Canopy Run menu, click on "Run File".
What happens?
- Go back to the Code Editor and add the following line:
print 'I like 6.00.1x!'
- Select “Run File” again (you can also use the green triangular Run button on the toolbar).
What happens?
- Close your test file by clicking the X in its filename tab.
- Now reopen your test file by double-clicking its name in the File Browser's "Recent Files" folder.
Congratulations - your Python environment has been installed, and you now know how to enter expressions in Python and how to save, run, and open files!
INSTALLING ENTHOUGHT FOR LINUX (RH/CENTOS 5 OR HIGHER, OR EQUIVALENT)
To download Enthought Canopy on your Linux machine, you should follow these steps:
- Visit the Enthought website's download page (https://www.enthought.com/downloads/)
- The site should detect your operating system, but check that it shows "Linux", and that you select the flavor (32-bit or 64-bit) that corresponds to your Linux system installation. Click the green "Download Canopy…" button.
NOTE: the course has been tested on the 32 bit Python version. You can run 64 bit if you want, but we can’t promise that every assignment will run correctly.
- Canopy for Linux is distributed as a self-extracting shell script. Once the file has downloaded to your system, the install can be started by executing the following command from within the download directory (the exact name "canopy-1.1.0-rh5-64.sh" may differ slightly, depending on which Canopy installer version you just downloaded):
bash canopy-1.1.0-rh5-64.sh
- The installer will present the Canopy End User License Agreement for approval. If you agree to the license, the next prompt is for the installation location. The default installation location is ~/Canopy.
Once the installation is complete, the last step is to set up your Python environment. Launch Canopy from your Applications directory and the application will guide you through the process.
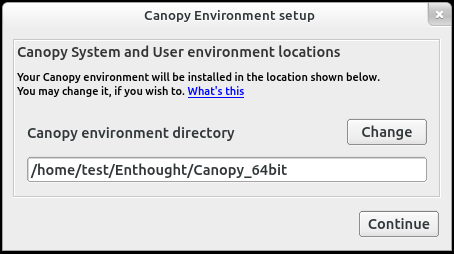
If you have an ASCII (English letters, numbers, and punctuation) user name, then you can accept the directory which is proposed. Otherwise, please enter a writeable directory whose path contains only ASCII characters. See this article in the Enthought Support Knowledge Base for more details.
After the environment is installed, Canopy prompts you to make it the default Python environment:
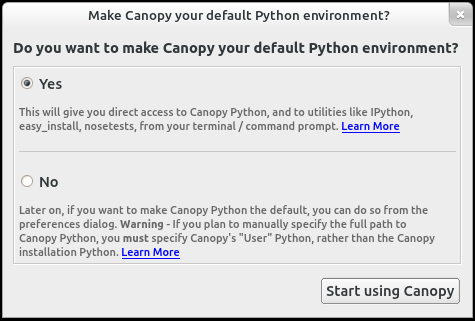
For most Linux users who are already using another Python distribution, it will be safer to select “No” for now, so as not to interfere with the operation of your other Python. You can still run Canopy Python safely inside the Canopy application's editor. For some, the default “Yes” response may be the most convenient.
Once you have made your selection and set up your environment, the Canopy Welcome screen should be visible. If there are any Canopy application updates available, you will see a note in the bottom-right corner of the Welcome window, which you can click to open the About window in order to install the updates. You can also view this window by clicking “Canopy Application Updates…” from the Help menu. Please install any available updates.
Canopy is now set up and is ready to use!
Expert note (optional): if you choose not to make Canopy your default Python environment, but you still do want to use Canopy User Python from the Linux command line, please read this article first to avoid confusion, since Canopy User Python does not live where you might assume it does.
CANOPY APPLICATION OVERVIEW
To help you get an understanding of the Canopy application, this article in the online Canopy User Guidedescribes the basics of the Editor. You can also access the User Guide offline through the Canopy application by selecting the "Documentation Browser" from the Welcome screen (the User Guide is the top item listed in the Documentation Browser window).
Opening an Editor window typically presents you with the following (screenshot is from Mac OS X but are similar in Linux):
This window combines three commonly used parts: (1) File Browser, (2) Code Editor, and (3) Python (IPython) interpreter pane.
- The IPython prompt looks something like this:
In [1]:
- Try typing the following simple expression after the IPython prompt:
3*5
- What happens when you press the Enter key?
- Try typing the following simple expression after the IPython prompt:
'foobar'
- What happens when you press the Enter key?
To create, save, run, and re-open a file:
- In the Canopy Editor's File menu, select "New", then "Python file". On the first line of the new file, type the following:
print 'hello world'
- You will want to save your files in a location specific for this course. To do that, first create a directory (or folder) for your 6.00.1x material, with an appropriate name.
- To create a new folder using Canopy:
- Use the File Browser to browse to the existing folder where you want to create your course folder. (If you can't find the desired existing folder in the File Browser, you can right-click and select "Add Top-Level Path".)
- Right click on that existing folder and click "Create Directory", which will create a new folder inside the existing folder.
- Type a name for the new folder, such as “6.00.1x Files,” and press ENTER.
- You may also create the folder using any Linux tools that you prefer.
- Now you will save your "hello world" file in the new folder that you just created.
- From the Canopy File menu, click Save As and then navigate to your course folder before typing a name for this file, e.g., "pset0Test.py".
- Note: Be sure to type the ".py" file extension, so that Canopy and Linux recognize this as a Python file! In other words, always save your Python files as fileName.py, instead of just fileName
- Click the Save button.
- At this point, please add your course folder (“6.00.1x Files” in our example) to the Canopy File Browser so that you have easy access to it each time you start Canopy. To do this, expand the Recent Files folder in the side pane and right-click on the file you just saved. Select Add directory as Top-level and now you should see your course folder in the File Browser.
- From the Canopy Run menu, click on "Run File".
What happens?
- Go back to the Code Editor and add the following line:
print 'I like 6.00.1x!'
- Select “Run File” again (you can also use the green triangular Run button on the toolbar).
What happens?
- Close your test file by clicking the X in its filename tab.
- Now reopen your test file by double-clicking its name in the File Browser's "Recent Files" folder.
Congratulations - your Python environment has been installed, and you now know how to enter expressions in Python and how to save, run, and open files!
 2_syntax_keyword_vars_scope.pdf